
Window Installation 101: What Homeowners Should Know Before Replacing Their Windows
Understanding the Importance of Preparation
So, you’re getting new windows! That’s awesome. New windows can really change how your house looks and feels, plus they can save you money on energy bills. But before the installers show up, it’s important to get ready. Think of it like prepping ingredients before you start cooking – it just makes everything go smoother.
Why Preparation Matters for Window Installation
Getting your house ready makes the whole window installation process easier for everyone. It’s not just about being nice to the installers (though that helps!). A prepared home means the job can get done faster and with fewer hiccups. Imagine trying to install a window with furniture blocking the way – not fun for anyone.
Avoiding Additional Costs During Window Installation
Here’s a little secret: being prepared can actually save you money. If the installers have to spend extra time moving stuff around or dealing with unexpected problems, you might end up paying for that extra time. A little prep work upfront can prevent those extra charges down the road.
Ensuring a Smooth Window Installation Process
Think of window installation like a mini-construction project. The more you do to prepare, the smoother the whole thing will go. It’s about minimizing surprises and making sure the installers can focus on what they do best: installing your new windows. Plus, a smooth installation means less stress for you!
Preparing for window installation isn’t just about convenience; it’s about protecting your home and investment. By taking the time to clear the area, remove obstacles, and communicate any concerns, you’re setting the stage for a successful and stress-free experience. It’s a small effort that pays off big in the long run.
Clearing the Area Around the Windows
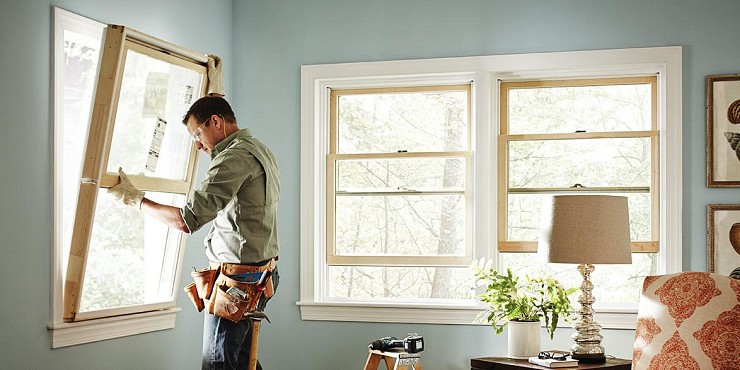
Window replacement is exciting, but it can also be a bit disruptive. One of the most important things you can do to help the installation go smoothly is to clear the area around your windows. It’s more than just tidying up; it’s about protecting your stuff and making the installer’s job easier. Trust me, a little prep work here goes a long way.
Removing Obstacles for Window Installation
Think about it: installers need space to maneuver those new windows. The less they have to work around, the faster and safer the job will be. Start by moving any furniture that’s close to the windows. If possible, move it to another room. If that’s not an option, push it as far away from the window as you can. Don’t forget about smaller items like lamps, picture frames, and plants. These can easily get knocked over or damaged during the installation process. Pack them away somewhere safe.
Protecting Your Belongings During Window Installation
Window installation can get messy. Dust, debris, and even the occasional dropped tool are all part of the process. To protect your floors and furniture, cover them with drop cloths or old sheets. This will catch any falling debris and prevent scratches or other damage. It’s also a good idea to tape the edges of the drop cloths to the floor to prevent them from slipping. I learned that the hard way during my last home project!
Creating a Safe Workspace for Window Installation
Beyond protecting your belongings, clearing the area also creates a safer workspace for the installers. A cluttered area can be a tripping hazard, and it can also make it difficult for the installers to move around freely. By clearing the area, you’re helping to prevent accidents and injuries. Plus, a clear workspace just makes the whole process feel less chaotic.
Think of it this way: you’re setting the stage for a successful window installation. By taking the time to clear the area, you’re showing the installers that you’re prepared and that you value their safety and efficiency. It’s a small gesture that can make a big difference in the overall experience.
Removing Window Treatments and Cleaning Frames
Taking Down Curtains and Blinds
Before the installers arrive, you’ll need to remove all window treatments. This includes curtains, blinds, shades, and anything else covering your windows. Carefully unhook or unscrew them from their brackets. A good tip is to label each set of treatments with the corresponding window to make reinstallation easier later.
- Remove curtains and drapes from rods or tracks.
- Unscrew or unclip blinds and shades from their mounting brackets.
- Store all hardware (screws, brackets, etc.) in labeled bags.
Labeling Window Treatment Hardware
It’s easy to get mixed up when you have multiple windows. Keep hardware organized by labeling bags or containers with the room and window number. This will save you a lot of time and frustration when you go to rehang everything. I usually use masking tape and a permanent marker. It’s not pretty, but it works!
- Use masking tape and a marker to label bags.
- Take photos of the hardware before removing it.
- Keep all hardware together in a central location.
Cleaning Window Frames Before Installation
With the window treatments out of the way, now’s the perfect time to clean the window frames. A simple wipe-down can remove years of accumulated dust and grime. Plus, you can inspect the frames for any damage or issues that need addressing before the new windows go in. It’s also a good time to think about things like, how are mirrors made, and if that process could be applied to windows.
- Wipe down frames with a damp cloth and mild detergent.
- Use a brush to remove dirt from corners and crevices.
- Inspect frames for cracks, rot, or other damage.
Cleaning the window frames is more than just aesthetics; it allows you to identify any underlying issues that might affect the new window installation. Addressing these problems now can prevent bigger headaches down the road.
Ensuring Access for Installers
One thing that can really speed up the window installation and make it less stressful for everyone is making sure the installers can actually get to the windows easily. Think about it – the easier it is for them to move around, the faster the job will get done.
Clearing Indoor Pathways for Window Installation
First, take a look inside your house. Are there any hallways or rooms that are cluttered? Clear a path so the installers can move freely from window to window. This might mean moving furniture, boxes, or anything else that’s in the way. The goal is to create a clear, unobstructed route.
Preparing Outdoor Areas for Window Installation
Don’t forget about the outside of your house! If you have any outdoor furniture, potted plants, or garden decorations near the windows, move them. Installers need to be able to get close to the windows without tripping over anything. Also, make sure any gates or fences are unlocked so they can access all areas of your property.
Considering Multi-Level Access for Window Installation
If you live in a multi-story house, think about how the installers will reach the windows on the upper floors. Is there a clear and safe path via stairs? If they need to use a ladder, make sure the ground is level and stable. It might be a good idea to trim any bushes or trees that could get in the way of the ladder.
Making sure the installers have easy access isn’t just about convenience; it’s also about safety. A clear and safe workspace reduces the risk of accidents and injuries, which is good for everyone involved.
Notifying Installers of Special Concerns
It’s super important to keep the lines of communication open with your window installers. Letting them know about any special needs or potential issues beforehand can really make the whole process smoother and prevent headaches later on. Think of it as giving them a heads-up so they can be fully prepared.
Communicating Specific Needs for Window Installation
Before the installation even begins, have a chat with the installers about anything specific they should know. This could be anything from where to park their truck to which entrance they should use. If you have a preferred way for them to access the windows, make sure they’re aware. The more information you give them upfront, the better they can plan and execute the job.
Addressing Allergies and Sensitivities
If anyone in your household has allergies or sensitivities, it’s crucial to let the installers know. Window installation can stir up dust and other particles, which could trigger a reaction. You might want to ask them to take extra precautions, like using dust extraction tools or wearing masks. It’s also a good idea to ensure good ventilation during and after the installation.
Discussing Unique Property Features
Does your house have any quirks or unique features that the installers should be aware of? Maybe you have delicate landscaping near the windows, or perhaps there’s a tricky access point. Pointing these things out beforehand can help the installers avoid any accidental damage or delays. It’s all about setting expectations and ensuring everyone is on the same page.
Think of it like this: the more information you provide, the better equipped the installers will be to handle any challenges that might arise. This proactive approach can save you time, money, and a whole lot of stress in the long run.
Preparing for Installation Day
Reviewing the Window Installation Process
Okay, so the big day is almost here! Before the installers arrive, take a moment to refresh your memory about what’s going to happen. Knowing the steps involved can ease your mind and help you anticipate any potential disruptions. Usually, the crew will start by removing the old windows, preparing the openings, installing the new windows, and then sealing everything up. It’s a good idea to ask the installation company for a detailed rundown beforehand so you know what to expect and when.
Managing Noise and Dust During Window Installation
Let’s be real, window installation isn’t exactly a quiet or clean job. There’s going to be some noise from tools and construction, and dust is pretty much unavoidable. To manage this, consider these points:
- Cover furniture with sheets or plastic to protect it from dust.
- Seal off doorways with plastic sheeting to contain the mess.
- If you’re sensitive to noise, plan to be out of the house during the loudest parts of the installation.
It’s a good idea to have some cleaning supplies on hand for a quick cleanup after the installers are done. A vacuum with a good filter can be a lifesaver for getting rid of lingering dust.
Planning Your Day Around Window Installation
Window installation can take a good chunk of the day, depending on how many windows you’re having replaced. It’s smart to plan your day accordingly. If you work from home, you might want to consider working from a different location for the day. If you have kids or pets, make arrangements to keep them occupied and away from the work area. And, of course, make sure you’ll be available to answer any questions the installers might have. It’s all about setting yourself up for a smooth and stress-free day.
Post-Installation: Testing Your New Windows
After the window installation is complete, don’t just admire the view! It’s really important to give those new windows a good check to make sure everything is working as it should. This helps catch any issues early and avoid bigger problems later on.
Performing an Operation Check of New Windows
First things first, make sure each window opens and closes smoothly. You don’t want any sticking, grinding, or struggling. Test the locking mechanisms too. Do they latch securely? Are there any weird noises when you operate them? If something feels off, now’s the time to flag it.
Conducting a Visual Inspection for Window Installation Quality
Take a close look at the window, inside and out. Check the caulking around the edges – is it even and complete? Are there any visible gaps or cracks? How about the trim? Does it look properly installed and aligned? Any missing pieces or damage? A careful visual inspection can reveal a lot about the quality of the window installation.
Testing for Air Leakage After Window Installation
Air leaks can negate the energy-saving benefits of new windows. Here’s a simple way to check: On a windy day, hold a lit candle or incense stick near the edges of the window frame. If the flame flickers or the smoke wafts noticeably, you’ve likely got an air leak. Pay special attention to the areas where the window meets the wall.
Checking for Water Intrusion After Window Installation
Water leaks can cause serious damage over time, so this is a crucial step. The easiest way to check is to wait for a good rainstorm and then inspect the area around the window, both inside and out. Look for any signs of water stains, dampness, or dripping. If you spot anything suspicious, it’s time to call the installers back.
It’s a good idea to document your findings, whether it’s through notes or photos. This will be helpful when you communicate with the window installation company about any necessary adjustments or repairs. Don’t hesitate to reach out if you find something that doesn’t seem right. Addressing issues promptly can save you headaches and money in the long run.
Frequently Asked Questions
Why is it important to prepare my home before new windows are installed?
Getting your home ready makes the window replacement job easier and faster for the installers. It also helps keep your belongings safe and can save you money by avoiding extra charges if the installers have to do more work than planned.
What kind of things should I move away from the windows?
You should move anything that might get in the way of the installers. This includes furniture, decorations, and anything else near the windows, both inside and outside your house. Make sure there’s a clear path for them to carry the old windows out and the new ones in.
Do I need to take down my curtains or blinds?
Yes, you need to take down all curtains, blinds, and shades. It’s a good idea to label them and their parts so you know where they go when you put them back up after the new windows are in.
How do I make sure the installers can easily get to all the windows?
Make sure all paths inside your home are clear, so installers can easily move from one window to another. Outside, move any furniture or plants that are close to the windows. If you have windows on higher floors, make sure there’s a safe way for them to reach those too.
Should I tell the installers about any special concerns I have?
It’s really important to tell the installers about anything special. For example, if someone in your house has allergies and needs less dust, or if there are parts of your home that are tricky to work around. Good communication helps avoid problems.
What should I do after the new windows are installed?
After the new windows are in, you should open and close each one to make sure it works right. Look closely for any gaps or missing caulk. You can also check for air leaks by holding a lit incense stick near the edges on a windy day. After it rains, check for any water getting in.